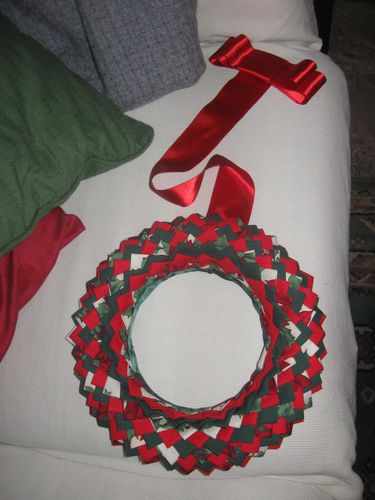
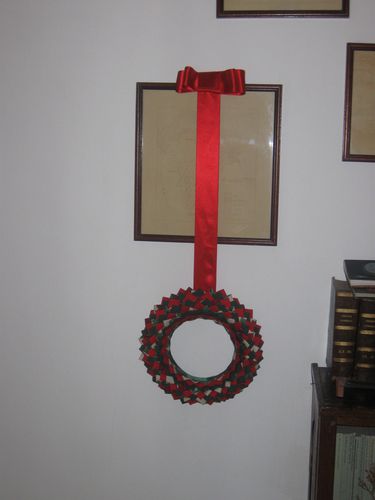
Ecco la ghirlanda patchwork tutto-relax terminata
Here is my Patch relaxing wreath finished
Voilà la couronne patch terminée
COSA OCCORRE USARE E FARE
A .
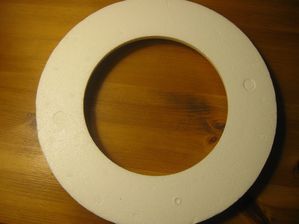
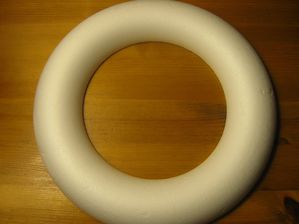
1 CERCHIO IN Polistirolo di ca. . 22 CM Ø con la base piatta
2. SCATOLETTA DI SPILLI PER PATCHWORK/Appliqué (lunghi circa 2 cm)
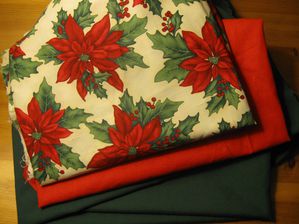
3. N° 3 DIVERSE COTONINE (anche 4 , dipende dal modello) in fantasia Natalizia o per altri occasioni di cui almeno 1
deve essere in tinta unita
4. CARTONCINO per il fondo del cerchio
5. NASTRO in seta in tinta per il cerchio interno
6. NASTRO per appendere la ghirlanda
7. N° 1 anello di ca. 2 cm Ø per tende in metallo dorato o argentato
You need to have and make
1. Styrefoam ring of 22 cm Ø flat base
2. A box of patchwork/Appliqué pins of about 2 cm
3. N° 3 different pieces of fabrics at least 1 solid and 2 printed (Xmas printing or else according
to the different occasions)
4. Cardboard or colourful (gift) paper to cover the ring base
5. Silk ribbon to fix in the inner circle of the ring
6. Silk ribbon to hang the wreath
7. N°1 brass or silver coloured metal ring for curtains of 2 cm Ø to hand the wreath
Il faut avoir et faire
1.Anneau en polystyrène 22 cm Ø dos plat
2. n° 1 boite de 100 épingles fines à patchwork /appliqué(env. 2 cm )
3. N° 3 Etoffes en coton fantasie et solid (au moins 1)
4. Carton leger ou du papier coloré pour couvrir le dos
5. Ruban en soie de la couleur que vous voulez pour l'intérieur du circle
6. Ruban en soie pour pendre la couronne
7. N°1 anneau en metal doré ou argenté à fixer derrière et pendre la couronne

B.

- Tagliare da ciscuna cotonina strisce di tessuto lunghe 25-30 cm e di altezza 5 cm
- CUT a 25/30 cm long x 5 cm h fabric strip from each fabric
- COUPER une bande de 25/30 cm l. x 5 cm h de chaque étoffe utilisée
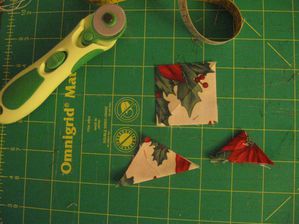 - Ogni striscia verrà poi tagliata in 5-6 quadrati da 5 cm (potete farli anche + grossi , dipende da voi!)
Piegare ogni quadrato , angolo contro angolo opposto per formare un piccolo triangolo
Ripiegare il triangolo su se stesso e formare un altro triangolo più piccolo da applicare alla ghirlanda
- EACH STRIP will be cut in 5-6 squares of 5 cm each (you can do bigger that's up to you and the size of
your item)
Fold up each square , diagonally ,corner against corner to get a small triangle . Fold it up again and you'll get
a smaller triangle to use on the wreath
- CHAQUE BANDE doit etre coupée en carreaux de 5 cm chacun (vous povez le faire plus grands, ça depend
de la dimension de la couronne que vous voulez)
Plier le carreau diagonalement , coin contre coin pour avoir un triangle qu'il faut plier de nouveau pour obtenir
le petit triangle qui ira sur la couronne
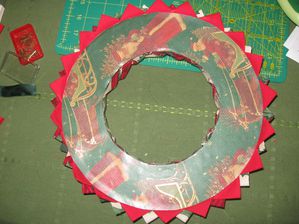
- Tagliare sulla carta colorata o cartoncino la sagoma della ghirlanda ed incollarla sul retro piatto della
forma (Foto)
CUT the wreath pattern from the gift paper or cardboard and glue it well on the flat back side of the
styrefoam wreath(photo)
COUPER le gabarit de la couronne sur le papier cadeau ou bien le carton léger et coller-le au dos plat (photo)

- Partendo dal bordo esterno verso il centro, fissare il primo triangolo con 1 spillo per parte e di seguito ,
SULLA STESSA FILA, fissate tutti i triangoli della stessa fantasia/colore e chiudere l fila a cerchio.
Fare una seconda fila di triangoli con l'altra fantasia/colore e girare in tondo a chiuderla. I triangoli di
questa fila saranno messi in modo "sfalsato" rispetto ai primi.(Vedi foto sopra)
- STARTING from the outside bord toward the center of the wreath , fix each triangle with 1 pin on one side
and share a 2nd pin with the corner of the subsequent triangle and so on , making the the ring all around.
Then start doing the same with the triangles made with the 2nd fabric , placing them alterbnatively respect
the previous row as shown in the ture above. Complete the row and start with the 3rd row and 3rd fabric
triangles . Cover the wholering , alternating the 3 fabric triangles till the inner circle (see photo )
- A PARTIR du bord extérieur vers le centre de la couronne, fixer chaque triangle avec une épingle sur un
côté et paratger la 2eme épingle avec le coin du triangle suivant et , ainsi, de suite tout autour l'anneau
à completer la ligne.
Ensuite, commençer la 2eme ligne avec les triengles de la 2eme étoffe en les plaçant alternativement
Couvrir l'anneau entièrement , en alternant les étoffes jusqu'à le circle intérieur (Photo à haut)

- Rifinire il cerchio interno con nastro in seta in tinta (fermato con gli spilli) ,e fissate un nastro di raso di
altezza 6-8 cm nel retro della ghirlanda terminante con un fiocco . Dietro al fiocco con 2 punti fissate
l'anello di metallo per appendere la ghirlanda
FINISH the internal circle with some silk ribbon fixed with pins and another silk ribbon (5-8 cm high)
ending with a bow . Fix behind the bow with 2 stitches the metal ring to hand the wreath
DECORER le circle intérieur avec du ruban en soie fixé avec les épingles , ajouter un autre rouban
de 5-8 cm hauteur à la couronne avec un flocon final. Fixer l'anneau en metal derrière le flocon pour
pendre la Couronne au mur