
BUONGIORNO A TUTTI! Vi presento i miei ultimi amici , gli amici della Stagione delle Meraviglie, Natale!
Questo piccolo esercito di omini di neve si è fatto fotografare prima di prendere posto definitivamente nel lavoretto che ho realizzato .
BONJOUR A TOUS! Je vous prèsente mes derniers amis , les amis de la Saison des Merveilles, NOEL!
Cette petite armèe de bonhommes de neige gardent la pose avant de prendre leur position définitive dans mon dernier travail
GOOD MORNING TO YOU ALL! I'm introducing you my last friends , the friends of the Season of Wonders, CHRISTMAS ! This little funny army of snowmen are strikign a pose before taking position in my alst Xmas work ...
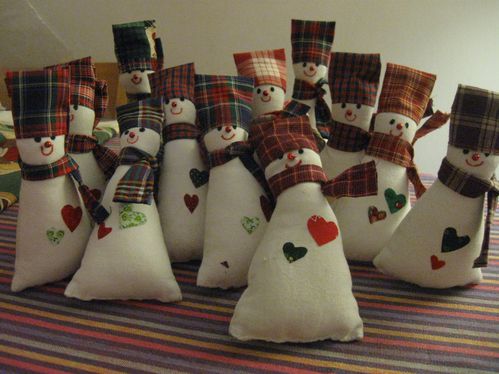

ed eccoli tutti insieme per diventare ....... et voilà tous ensemble pour devenir...
Here they are all together and become...


 INGREDIENTI
- Cotonine fantasia natalizia o scozzesi/quadretti
- Stoffa di cotone bianca (per gli omoni)
- Pennarello rosso (bocca) e nero(occhi)
- Rafia naturale
- Imbottitura sintetica per pupazzi
- Filo rosso/bianco e nei colori dei tessuti natalizi per cucire , fobici , colla Vinavil e colla a caldo
- Perle rosse (naso)
- Bastoncini in legno per involtini (lunghi ca. 20 cm)
- Tela termoadesiva
- 1 cestino di vimini rotondo di ca 22 cm diametro
1. Diasegnare e tagliate per 2 volte la sagoma di un omino di neve su tessuto in cotone bianco
2. Imbastire le due sagome lungo i bordi e poi passare con la macchina da cucire , lasciando il bodo in basso aperto
3. Rigirate i pupazzi al diritto, 1 colpo leggero di ferroda stiro per stendere bene il tessuto, imbottire i pupazzi e
chiuderli alla base con piccoli punti
4. Tagliare dalla stoffa fantasia dei rettangoli di circa 9-10 cm (cappello/foulard) . Rigirate il bordo di 5-6 mm da uno
dei due lati lunghi (per rifinire) e passatelo a macchina .
Avvolgete il rettangolo attorno alla testa, piegate i 2 lati 1 sopra l'altro (verrà una specie di cono)
e ripiegate la parte alta verso il basso . Fissatela con 2 punti a mano ed il cappello è fatto.
5. Tagliate una striscia dal tessuto fantasia di ca 22 cm di lunghezza per 6 cm di altezza che ripiegherete in 3 per
lunghezza . Fermate la chiusura della 3° parte con una passato a macchina .Annodate la sciarpa attorno al collo.
6. Tagliare da stoffa natalizia (diversa dal cappello e sciarpa) 2 piccoli cuori da 1,5 e 2 cm . riportate le sagome su
carta termoadesiva , ritagliateli e poi a ferro caldo applicateli sulla parte frontale dell'omino(dove andranno
occhi e bocca!)
7. Con il pennarello nero per stoffa disegnate gli occhi e con quello rosso la bocca
8. Applicate la perlina rossa come naso
Per la scopetta
Dal gomitolo di rafia , tagliare ca. 50cm di filo ed avvolgerlo attorno a 3 dita per avere una matassina di ca.5 cmm, nella quale infilerete il bastoncino di legno (privato della punta da spiedino e di almeno altri 7-8 cm di legno ).
Fermate il tutto a mezzo cm dal bordo della matassina con filo rosso e se volete potete mettere 2 gocce di colla nella punta del bastoncino (nascosto dalla rafia) per fermarlo meglio.
Tagliate nella parte opposta del bastoncino e della fermezza la rafia dove doppia così da ottenre una scopina. pareggiate bene i fili perchè saino uniformi in lunghezza.
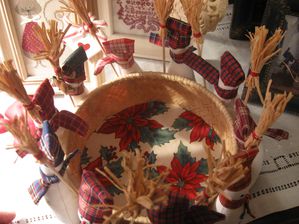
Ora fissate bene ogno omino al cestino direttamente mettendo 2 punti con ago e filo (chiaro) fra l'omino ed il il vimino.
Per la scopetta , potete fissarla ugualmente con ago e filo oppure con 2 gocce di colla A CALDO .
Al centro del cestino , potete preparare un centrino all'uncinetto oppure ricamato oppure con semplice tessutoo comprarlo già fatto!!
INGRÉDIENTS
- Etoffe en coton fantaisie de Noël ou écossais / Vichy
- Étoffe coton blanc ( pour les bonhommes)
- Marqueur rouge (bouche )et noir (yeux )
- Raphia naturel
- Rembourrage synthétique
- Tissu thermocollant
- Fil rouge/blanc et dans les couleurs des tissus de Noël pour coudre, ciseaux , colle normal et colle à chaud
- Perles rouges, nez)
- Brochettes en bois d'environ 20 cm de longeur-
- 1 corbeille ronde en osier de 22 cms diamètre environ
1. Dessiner et découper 2 fois le gabarit du bonhomme sur tissu de coton blanc
2. Badigeonner les deux silhouettes sur les bords, puis passer à la machine à coudre, en laissant ouvert le
bord en bas
3. Renverser la marionette à la droite, donner un coup de fer , rembourrer le bonhomme et fermer la base
avec de petits points
4. Couper dans le tissu de Noel un rectangle d'environ 9-10 cm (chapeau / écharpe). Remuer 5-6 mm du bord
de l'un des deux côtés la plus longue et passer à la machien à coudre.
Envelopper le rectangle autour de la tête, plier les 2 côtés dessus de l'autre (il sera une sorte de cône) et
plier -le de haut en bas. Fixez avec 2 points et le chapeau est fait .
5. Couper une bande de tissu à motif d'environ 22 cm de long sur 6 cm de hauteur et plier-le 3 fois à la longeur
Fixer les 3 épaisseurs avec la machien à coudre. Envelopper l'écharpe autour du cou.
6. Couper du tissu de Noel (différant que celui utilisé pour le chapeau et l'écharpe ) 2 petits coeurs de 1,5 et
2 cm. ,placer les petits gabarits sur papier adhésif thermique, puis les couper et les appliquer au fer chaud
sur le devant du bonhomme
7. Avec le marqueur noir dessiner les yeux et avec le marqueur rouge la bouche
8. Appliquer la perle rouge pour le nez
Pour le balai
Couper env. 50cm de fil de rafia et l'envelopper autour de 3 doigts pour avoir une echevette de 5 cmm edans laquelle insérer la brochette , privé de la pointe et d'autres 7-8 cms de bois.
Fixer tout à demi cm du bord de l'echevette avec du fil rouge et si vous voulez vous pouvez mettre 2 gouttes de colle sur la pointe du petit bâton, caché dans le raphia pour le fixer mieux.
Couper les fils raphia doubles de sorte à obtenir un petit balai . Egalizer bien les fils parce qu'ils soient uniformes en longueur.
Maintenant fixer bien chaque petit homme à la corbeille directement en mettant 2 points avec aiguille et fil, entre le bonhomme et l'osier.
Pour le balai, vous pouvez le fixer également avec aiguille et fil ou avec 2 gouttes de colle À CHAUD.
Au centre de la corbeille, vous pouvez préparer un napperon au crochet ou brodé ou avec du tissu de Noel
INGREDIENTS
- Christmas Printed cotton Fabric or checked / tartan
- White cotton fabric (for the chaps)
- Red marker (fills)((blocks),(mouth)) and black (eyes)
- Natural raffia
- Synthetic filling
- Thermo-interfacing fabric
- Red / white thread and in the colors of fabrics(tissues) of Christmas to sew, scissors, standard glue
and hot glue
- Red pearls, nose)
- Wooden brochettes(bunches) about 20 cms of longeur-
- 1 wicker round basket of 22 cms approximately diameter
1. Draw and cut twice the template of the snowman on white cotton fabric
2. Baste the outlines laong the edges and then sew them , leaving the base open
3. Turn the snowman right side , iron it to well stretch the fabric, stuff the snowman and
close the base with small points
4. Cut a piece of printed fabric of about 9-10 cms (hat / foulard). Turn one of the longer site edges of 5-6
mm and sew
Fold the rectangle around the head, fold up the 2 sides placing 1 above the other (a kind of cone will
come) and refold the cone top downward the tall part.
Fix it with 2 stitches and the hat you/he/she is done.
5. Cut a strip from the printed fabric of about 22 cm long & 6 cm in height and fold it 3 times (lenght).
Close the 3 layers of fabrics by sewing the scarf . Tie a scarf around the neck.
6. Cut from Christmas fabric (other than teh one used for hat and scarf) 2 small hearts of 1.5 and 2 cm.
Place their templates on interfacing, then cut and apply them with hot iron on the front side of the snowman 7. With the black marker draw the eyes and with the red one the mouth
8. Apply the bead in place of red nose
For the broom
From the ball of rafia, cut about 50cm of thread and wind it around 3 fingers to have a skein of 5 cms, in which you will insert the wood stick (without its point and other 7-8 cms) .
Close and fix everything to half cm from the edge of the skein with red thread and if you want you can put 2 drops of glue on stick top (hidden from the rafia) to better fix it.
Cut on the other side of the stick the rafia double threads to obtain a little broom . Equalize well the threads in length .
Fix directly and well each snowman to the basket putting 2 stitches with needle and thread among the puppet and the wicker side.
For the broom, you can also fix it with needle and thread or with 2 drops of Hot glue.
For the center of the basket, prepare a crochetted or an embroidered round top


/idata%2F2569825%2Fi-miei-lavori-decorativi%2FPC010255-copia-1.JPG)
/http%3A%2F%2Fencrypted-tbn0.gstatic.com%2Fimages%3Fq%3Dtbn%3AANd9GcTw1oD8bNCkFfGyT--0meGM5hDBcvazoiQQCrBhvwSDWpU8z5uz)
/http%3A%2F%2Fencrypted-tbn1.gstatic.com%2Fimages%3Fq%3Dtbn%3AANd9GcTSWl7qOqYWUSJiBJNT5nCqKJxnt7PoFUoe0MzYrQWrFZa2uDUb)
/http%3A%2F%2Fwww.christmasgifts.com%2Fclipart%2Fchristmasholly16.jpg)